Friday, November 12, 2010

Advent {Calendar} Day 2

Day two and we've completed three pockets and started three more. So on top of the two I made yesterday {both white with red polka dots} we have 5 completed . . . 20 more to go.
I made the green with lime green polka dots the same as yesterday. I traced the dots using a poker chip {out of everything I could find that was the best size, but you obviously can use anything or even free hand them}.

My girls made the other two. My 9 year old made the ice skate {it's hard to see but there are two snow flakes above the skate}, and my 6 year old made the present. I cut out a piece of paper for each of them the exact size of the pocket and let them design their own. Once they had them drawn out, they cut out their pictures so they could trace them onto the felt and cut them out. I think they did such a great job! And it will be fun for them to see their own creations on our calendar. They've both started another one. My 9 year old is doing stripes and my 6 year old is doing a snowman . . . both of which are turning out super cute. I have another green polka dot one going too, but ran out of lime green, so I'm throwing in a red polka dot for fun. Anything goes . . . gotta love doing your own thing instead of going off of a pattern!

Thursday, November 11, 2010

Advent {Calendar}

I have been really wanting to buy an advent calendar for the past few years, and while shopping for one this year I came across this cute Pottery Barn one. I fell in love, but didn't think I could stomach spending $69 {plus shipping & handling} on something that I think I could make . . . especially when I have so. much. stuff. stashed away from old projects. {I have an extreme amount of felt left over from when I was making {this} quiet book, and have been trying to figure out what to do with it. Ah. Ha. Moment}. Anyway, so instead of posting my completed advent calendar I decided to post as I go so that, if you feel the rush that I did, you can follow along.

We only have 2 1/2 weeks left! So that's A LOT of sewing to do if we want it done in time. You in for a challenge?! I know I am! So join me, or save the ideas {if you even like them} for next year when you have a little more time.

Here's the inspiration . . . cute, right!?
I like to sketch out how I want to do things before I dive in. I decided {I think} to just make mine a square instead of a Christmas tree. Although I'm making all of the pockets first, so I can always change my mind if I feel like it. There are a few pockets that I'm not sure what to do with yet . . . but I have plenty to "use" from the Pottery Barn one. Just haven't decided yet.
I'm cutting my pockets out of felt {but am not eliminating the idea of using some scrap fabric on anything either}. Each pocket is 4" x 5 1/2". {By the way, my camera must have been on a funky setting because the red I used is NOT that bright or orange. It's just a regular deep red}. I traced my circles using a "token" {aka poker chip . . . my kids earn tokens for good behavior . . . we don't actually play poker . . . if you were wondering. lol}. I'm going to make two of these, and then two more just like this using deep green for the pocket and lime green for the polka dots.

We have 25 to make and only 19 days to do it, so I'm giving myself the goal of making at least 2 pockets a day {but shooting for more like 3} so I have time to sew them all onto the main/big fabric and stitch all of the numbers on. I'm hand stitching most of them since I run around like a crazy taxi driver all week and sit through hours of sports with my kids. I actually prefer the hand stitched look anyway {not to mention every time I try to machine stitch felt it always stretches in absurd ways}.
So good luck! Let me know if you're following along so I can post more sketches the day before of the pockets I'm going to do.

And last note: it's good to be back!

Friday, July 30, 2010

So Sorry for Being SO {M.I.A.}!!!

Aaaaand we're back! Although I can't see myself getting my sewing machine out for another few days I just wanted to let you know that I have NOT forgotten about my blog. For the past few months I've been sick with morning sickness . . . and now that that has gone away {for the most part} we've been busy moving. My love was offered a job in San Diego {where we both grew up} so of course he couldn't say no . . . so as sad as I am to leave the great people of Irvine I am beyond thrilled to be back "home." I have unpacked most of our house and hope to bust out the sewing machine and TONS of fabric {most of which I completely forgot about until I had to box it up . . . "Uhhh . . . errr . . . where did all of THAT come from?!"} so I have plenty to work with and plan on coming up with something creative . . . hopefully!

Sooo . . . to sum it up . . . don't give up on me! I'll be back just as soon as I get the rest of our lives unpacked {priorities royally stink sometimes . . . lol}.

Sunday, June 27, 2010

Best Recipe Website!!

Okay, I know I am a serious slacker! So sorry!! I've been in a major slump. I'm almost positive that it has something to do with the morning sickness I've had . . . I'm pregnant with #4 and have been SO. tired!! I really do intend to get this blog back up and running soon!!

I have been craving cake from my favorite little cake store called Nothing Bundt Cakes, and since I live nowhere near one, I decided to look up a copycat recipe . . . which led me to this website tonight . . .


I am in love . . . it's a fan stinking TAStic website . . . can't wait to try some of the recipes. Enjoy.

Sunday, April 25, 2010

Charish's Hope

Photobucket
My 8 year old, Hannah, came up with the idea to raise money {by selling bracelets} to help people with heart disease in memory of her Aunt Charish. {You might remember this post.} On Jan. 1 of this year she collapsed due to a heart condition called cardiomyopathy and passed away a few days later. She left behind three young kids and 4 nieces, all of which are understandably heartbroken. I'm so proud of Hannah for finding a way to channel that pain and do something good with it. She hopes that you will enjoy her creations!

Here are the three color options that she has come up with. From left to right, Cotton Candy, Watermelon, and Soccer Mom {she wanted to make one that boys would like too, and since Charish was an avid soccer mom, she decided to use the colors of her boys' soccer teams}.
Each bracelet is $2, and can be made Small {babies up to age 24 months}, Medium {kids 2-abt 11}, or Large {adults and kids 12 +}. We are going to set up a PayPal option for payment, but for now you can just comment to this post with your order and mail her a check {send me a message at lyricpoulson@gmail.com for her address}. I will try to get a PayPal account for her up and running soon!! Sorry for the inconvenience!
Thank you for supporting her cause!

Monday, April 19, 2010

{No Sew} Flowers

I love Made {here}. If you read my blog regularly you already know that. She always has cute . . . usually easy ideas. She is doing something until Mothers Day called Celebrating Mom where she will have cute ideas you can do for your mom or other women in your life. I'm excited to see what she has thought up!!
This morning she kicked it off with these no sew flowers. Find her free tutorial {here}. I'm going to pull out the scraps and make a few. I think they would be cute in the girls room too. I think I might actually sew along the bottom though to ruffle the fabric making it easier to "bunch" . . . but then again, she knows what she's doing, so I'm sure it probably is easier how she posted.
Thanks for another great idea, Dana!

Friday, April 2, 2010

{Egg-y} Cuteness!

I love LOVE coming across cute ideas for holidays . . . this is by far my favorite Easter blog post I have seen. So so cute. I can't wait to do this . . . hoping that I have enough time after planning a birthday . . . we'll see. :/

I found this idea on Poppy Talk. You can find the picture tutorial {here}.


Have I said I'm in L.O.V.E with this idea?! Happy Easter!!

Oh and {p.s.} . . . I promise, PROMISE I will get to the giveaway soon!! I have been SO busy with family and planning a GIRLY birthday party. 

Thursday, April 1, 2010

Ruffle Dress {Men's shirt refashion}

I've been meaning to try another shirt dress for a while {I tried the first one about a year ago . . . here}, so I finally broke out the old shirt {and white scraps from an old bed skirt . . . I know, I save too much junk}. I wish I would have figured our her measurements a little better . . . live 'n learn, right! {Oh, and I attempted an elbow length sleeve . . . didn't quite measure right on that one either . . . just looks like I made them too short . . . sigh}
Cutting up the shirt. By the way . . . the tutorial for this shirt is found on Dana Made It {here}. I love how she adds tutorials to the stuff she makes . . . the main reason why I try to do that as much as I can here. Of course, my daughter had to be all up in the action . . . gotta love her.
All made . . . I also made her a little hair clip to match.


A little picture happy . . . can't have too many. {Okay, probably not true . . . but I DID cut back a little bit and delete a few . . . I need help}
The back . . . I decided to turn around the shirt and have the buttons go up the back. 


And that's it . . . I have a few tweaks to make. It's a little tight on the shoulders, but now I know for next time. 

Tuesday, March 23, 2010

Crafty Chic is {FEATURED} on The Rubber Punkin!!

My first feature!! I was so excited to get an email from Emily at The Rubber Punkin this week letting me know that she picked my blog to feature. Go on over and check out her cute blog and leave her some love. Thank you Emily!

The Rubber Punkin

{p.s.} I've reached 50 followers today!! I will set up my giveaway and announce details soon!!


Friday, March 19, 2010

Toddler Skirt {refashion}

Aaaand I did another refashion today. I'm having a fun time turning our trashed clothes into something cute. Today I took my 8 year old daughter's OLD trashed dress and made a skirt for my 2 year old. Not sure if I like it on her . . . but if I don't like it on her I will bring out the waist and give it to my 5 year old.
Here's the dress. A total mess. I cut it off at the waist, cut the zipper and lining out, and saved the top strip to make a flower hair clip.
Cut the waist band straight across . . . and sew up the side.
Fold over the top and sew about 1/4" to get rid of the raw edge . . . 
then fold down far enough to fit your elastic through and sew, leaving about 2 inches open. Measure elastic to fit around your child's waist. Attach a safety pin to one end of the elastic and feed it through the hole. 
When it reaches all the way through, sew the ends together, pull tight to fit all the way inside the waist band and sew up the hole. Easy capeasy.
Using the extra strip of fabric from the top part of the dress I made a little flower clip. Tutorial to come . . .


Thursday, March 18, 2010

To My {Followers}

There has been a surge of followers to my blog lately, and it's so fun to click on all of you and find your blogs. I have found a few really fun blogs through you with so many inspiring ideas, so THANK YOU!! 

I hit 40 followers today {what!?}, and it gave me the idea to do my first give away. When my blog hits 50 followers I am going to do a giveaway . . . not going to say what yet . . . but all of my followers will be eligible to win. 

More details to come . . . 

Wednesday, March 17, 2010

Crayon Roll {tutorial}

I made my older girls crayon rolls for Christmas and they use them all. the. time. So we decided that for their friends birthday's this year I would make them one too. Birthday party tomorrow . . . sewing tonight. {I'm THE biggest procrastinator on the planet . . . but at least I usually get things done}

{Disclaimer} Before I get started I should point out that my dimensions are for the Crayola Mini Twistables crayons. I definitely prefer these over regular crayons because the inside of the crayon roll stays MUCH cleaner. If you want to use regular crayons you'll need to take the dimensions down a bit. Sorry, I don't have those, but I know there are other tutorials online and all the one's I saw use regular crayons.
Start by cutting out your pieces. 
You'll need one piece of thicker fabric {I usually use home decor fabric . . . that way you don't have to iron on interfacing to make it thicker} for the inside, and one piece of regular fabric for the outside. They both need to measure 18 1/2" x 6".
Cut one piece of fabric for the crayon pockets. It needs to measure 18 1/2" x 7.
Fold down the 18 1/2" x 7" piece of "pocket" fabric in half . . . line up with the bottom of the home decor fabric and start sewing straight lines all the way down the pocket fabric. The first measurement will be 1 3/8" from the edge. All other spaces will be 1 1/8" apart. You should get 16 pocket's.
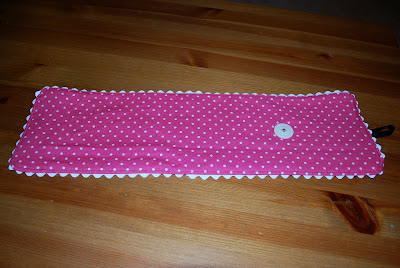
You don't have to use rick rack, but I think it makes it a little cuter. I used medium rick rack for this one. Go around and pin making sure to line it up so it doesn't go over the edge.

Sew on a button {sorry, I forgot to take a picture} about 4 1/2" in, onto the outside fabric. {I accidentally sewed mine about 5" in and it's pretty tight.}
Pin the outside piece onto the inside . . . right sides together. Make sure you leave a space open so you can flip it right side out. I always leave the side closest to the button open.
Flip right side out.
And push all of the edges and corners out so that it lays flatter.
Cut a piece of thin elastic about 4" long. Fold in half and pin half way down the edge. Make sure that it's on the same side as the button . . . the side I leave open.
Sew about 1/8" all the way around to flatten the entire thing . . . and closing the open seam.

Fill with crayons . . . 
. . . and roll up! 


OLD Nightstand . . . Painted {RED}

My parents have had this nightstand for YEARS . . . I mean like 25 years +. They ran out of room and handed it down because I have been dying to have one {so so tired of not having something to put my book, phone, junk on}. Only . . . slightly ugly.
I've always wanted to paint some piece of furniture red . . . don't ask me why . . . couldn't give you a good answer. 
{And FYI . . . Krylon spray paint at Joann = $7.99. Krylon spray paint at Walmart = $2.97 . . . learned the hard way that spray paint at Walmart isn't just slightly cheaper . . . it's WAY cheaper!}
I was hoping for a deeper red, and this picture came out a little brighter than it actually is, but it works and I like it better than the 80's "wood." I REALLY should have spent a little bit of time sanding it down . . . didn't hold the paint very well . . . live & learn, right.