Tuesday, May 24, 2011

More Fabric {Flowers}

 Day one of our paper chain activities was to make fabric flowers. My girls have been asking me to teach them for a while now, so it was fun to teach them how to do it. I recently posted a different kind of fabric flower {here} if you're interested. This isn't the best tutorial. I was trying to focus more on helping them figure it out than taking step by step pictures, but I did take a few and I'll try to explain it the best I can!

We cut 2 inch strips of fabric, folded it in half long ways, and stitched {using a long stitch. I used the longest stitch that my machine goes to. That way it's easier to bunch up the fabric} along the raw edge side leaving long "tails" of thread on either end. 

Taking one of the two threads on one end hold it tight while bunching up the fabric. Be really careful not to break the thread . . . if you do you'll have to re-stitch it and start again.
 My 9 year old wanted to make her friend a "bright pink" flower clip. She told my daughter that she's the nicest friend she's ever had today . . . made her day! I guess this is her "thank you." I didn't take pictures of the process, but once the fabric strip is bunched all the way, I started at one end and wound it around itself, hot gluing all along the way {wrap, hot glue, wrap, hot glue . . .}. Once we got it wrapped all the way around she cut out a felt circle and a clip and hot glued it to the underside. 
 Didn't it turn out super cute!?
 My 7 year old decided to also give something to her friend. She wanted to glue a flower onto a green pipe cleaner, but I ran out, so she decided it might be a cute idea to use a pencil for the stem. We just hot glued one end of the flower to the eraser side of the pencil, then wrapped around just like the first one {wrap, hot glue, wrap . . . you get the picture}
 After the whole thing was wrapped around the end of the pencil she cut a felt circle with a slit in it . . . 
 then I hot glued it to the bottom to hide all of the loose edges.
 My goofy daughter smelling her hot glue smelling flower. Fun little project . . . although I wouldn't let them hot glue. I've been burned one too many times and didn't want to deal with little burned fingers and tears. 

Monday, May 23, 2011

Paper {Chain}

It's ALMOST the end of the school year . . . about this time every year my girls get really REALLY unmotivated to wake up and be happy that it's a school day. Last night while discussing ways that we can enjoy the next couple of weeks my 4th grader came up with choosing a fun activity for every day until the end of the school year. In that idea I decided to help them make a paper chain where they could write different activities of their choice on each link.
They made a list of WAY too many things . . . so after some long discussion we got their list down to 17 things . . . one link for every day (even weekends) until the end of the school year. I went through my junk . . . er . . . I mean drawers of scrapbook paper {That's right . . . I went through "the scrapbooking" phase} and cut 1 1/2" strips.
We numbered all of the strips according to the dates we have left, and after looking at the calendar to make sure we didn't over schedule any of our days they wrote out their chosen activities on the strips.
{Notice the 6. Go to Golden Spoon strip? That's because I'm holding a fundraising event that night for an organization I started after my sister passed away called Charish's Hope. If you live close to Poway California and want to come support us and the American Heart Association come! June 6th from 6-10pm. I'll be there!}
Then after making sure we put them in the right order we taped the links together to make our chain.
The next couple of weeks are going to be action-packed . . . they're SO excited! Okay, I am too . . . especially for that "make brownies or cookies" day . . . bring ON the chocolate! ;)

Tuesday, May 17, 2011

Subway {Art} Tutorial

I've seen subway art a lot lately, and certainly wouldn't claim this as an original idea . . . just another tutorial!
They have these pieces of wood at Michael's in all different shapes and sizes. Be creative!
First off {I didn't take pictures . . . sorry!} paint your piece of wood in the color you ultimately want your letters/shapes to be. Let dry COMPLETELY so that when you stick on your letters it wont pull off the paint. I would be safe and allow to dry over night {or all day if you paint it in the morning!}

There are different ways you can apply the wording. My cute niece let me design what I wanted on her computer and she printed it all out on vinyl on her Cricut. I've seen other ways using the sticky backed contact paper. You can just print your design {which, by the way can be designed on a bunch of different computer programs like Photoshop or even Microsoft Word}. You can't print right on the contact paper but you can print it out on regular paper the size you want, spray the back with spray adhesive and stick it onto the non-sticky side of the contact paper. You'll just need to use a razor blade and carefully cut out each letter.
After sticking all of your words/shapes onto your painted sign, {and making sure every letter is pressed down completely} paint over the entire board with the "background" color. I used kind of cheap paint, so it took a few coats to get completely black.
This is the part that took a lot of patience for me! I wanted to see how it turned out . . . but WAIT!! If you don't wait until it's completely dry it will peel off funny and mess it up. Just. Wait!
When you're completely confident that the paint is all the way DRY!! carefully peel off all of the letters.
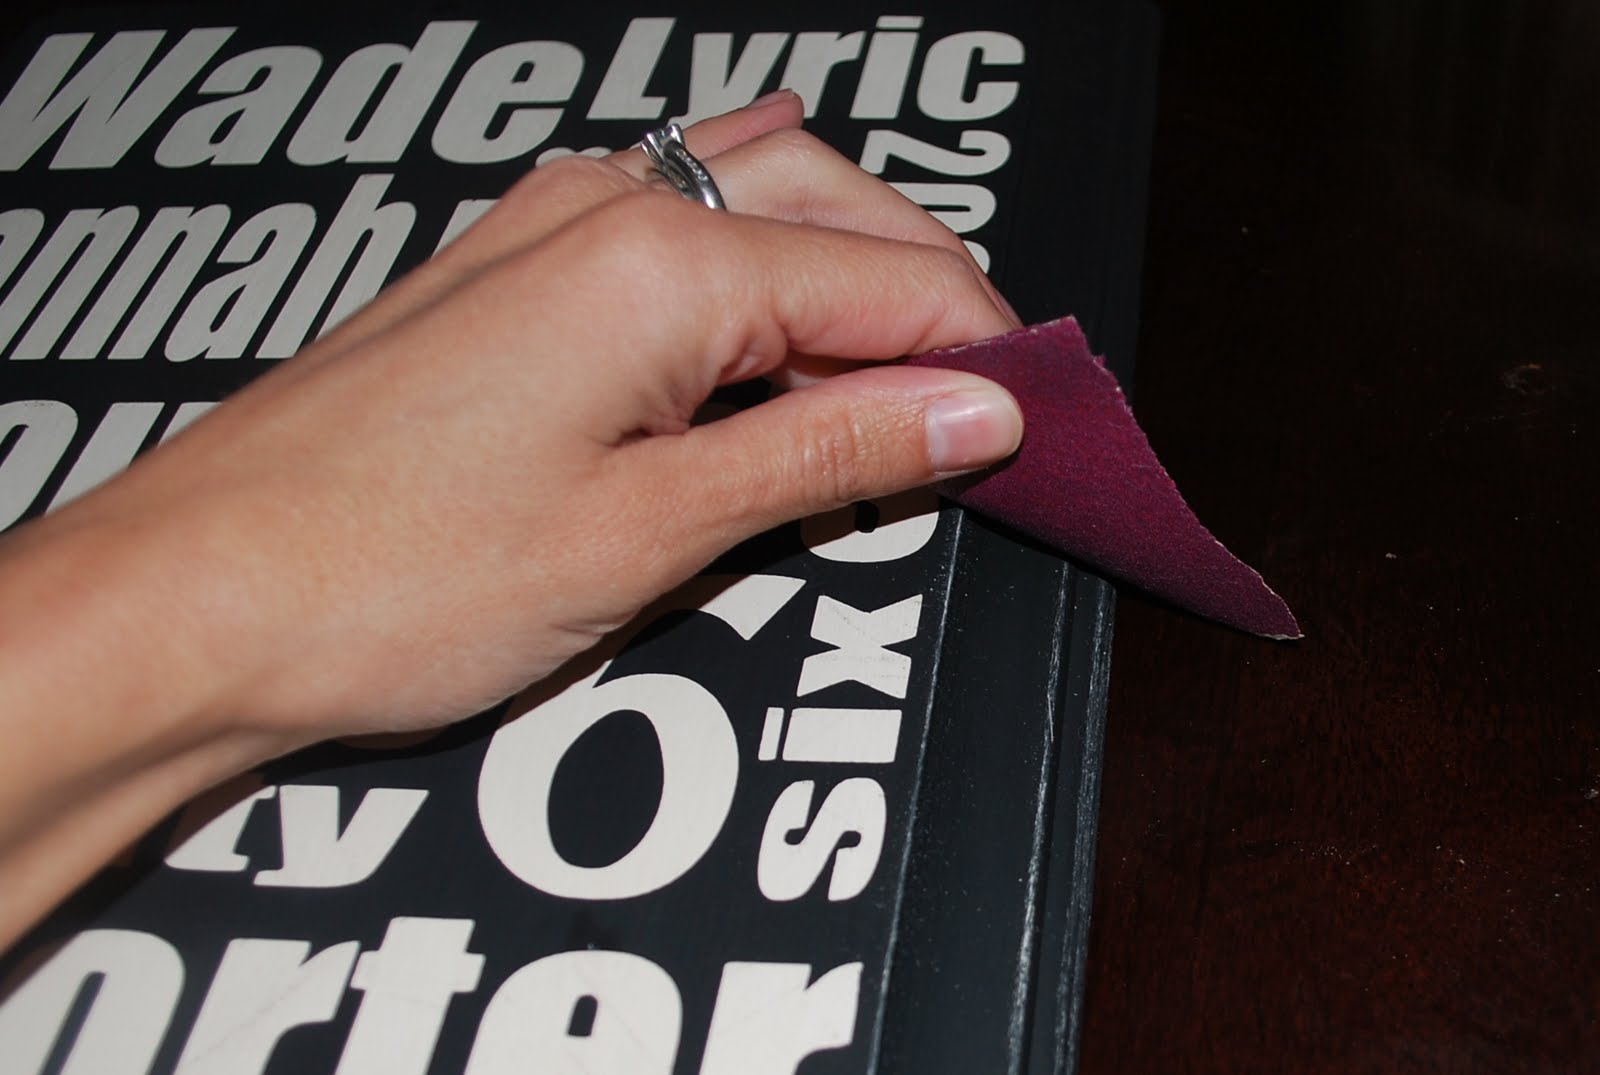
You can stop here or you can take it a step further by sanding down the edges to make it look a little more worn/old.

I like to do my projects as cheap as possible, so a lot of times I'll just use some of what I already have to save a buck. {That's right, I'm cheap!} I save everything that looks useful {and no I'm not a hoarder}. A baby blanket I got was wrapped in this white ribbon, and look! I was able to use it! Go me! Only thing is, I wish it were more of a cream color . . . someday I'll go buy one . . . maybe.

I used just a regular stapler to attach the ribbon to the back. I just used one piece of ribbon and looped it for a hanger. Make sure if you do it this way, to leave quite a bit of ribbon on the back and staple 6 or 7 times {or more if you think it's not sturdy enough}.
If you want to make a bow at the top just tie it right onto the loop.
And just hang it on a nail. The great thing about just tying a bow right onto the ribbon is if it looks crooked on the wall it's easily centered.


Wednesday, April 20, 2011

Fabric {Flower} Tutorial

I've been meaning to make a few more flower clips for my girls out of the extra t-shirt material I have left from my sisters shirts. I made a memory quilt for her little girl {HERE} right after she passed away and couldn't get rid of the rest of it. My girls love their "Charish flowers" so I wanted to make some more. I thought I'd share how I do it.

T-shirt material is great fabric to use because it doesn't fray. I love it, but it also works well with other fabrics also. Not to mention fraying is sometimes really cute!
I'm going to apologize right now for two things . . . my lame, half polished nails, and my not so perfect pictures. My good camera is dead and the baby is being good. Didn't want to waste the opportunity to get it done so I used my junk camera. :-/
Cut out a few circles. For this one I used 6. They don't have to be perfect. I used a soda can as a template. Dr. Pepper is never far from me . . . so that was the most convenient thing. Maybe I have a problem?? ha
Cut a small circle out of felt to glue the pieces to.
Oh this picture is awful! So sorry. Fold the circle in half, and then in half-ish again. It ends quartered, but it's good to not make it perfectly quartered. I like to do it off center.
Put a dab of hot glue on the tips and glue them down onto the felt piece.
I know . . . really?! These pictures . . . sigh. I'm just trying to show them glued onto the felt circle.
Put some hot glue on top of the four already glued down . . . just in the center . . .
. . . then for your last two circles try to fold them an extra time . . . more like in half, and then thirds . . . just to give some extra swirls. Glue them down on top . . .
. . . then while the glue is still soft pinch the whole flower so that it sticks up instead of lays flat. {Does that even make sense?? My tired, new baby brain is fried.}

Once your flower is glued together, cut another felt circle . . . a little bigger than the first one so that it covers it completely. Clip your hair clip directly onto the felt circle before gluing it down. The felt in between the clip will help keep the flower from slipping in your little girls hair.
Cover the felt circle with hot glue and then center it on the back of the flower.
We love them. They're very easy and if you're not into sewing this is a great little project for you! Happy spring!!


Tuesday, April 19, 2011

{CREATE}

"The more you trust and rely upon the spirit, the greater your capacity to CREATE"
I have loved this since I first heard it, and I think of it often. Just wanted to share! Enjoy.

Monday, April 18, 2011

S'more {Peep} Casserole

First off . . . I'm alive. I know . . . it's been forEVER and I've probably lost every follower I had. So sorry!! I've hit a wall as far as crafting goes. I had a sweet baby boy in December and just haven't gotten back in the groove. I really need something like this . . . a "me" thing . . . so I'm going to work on bringing this poor blog back to life!

Okay! So I found this adorable idea on my friend, Heather's, blog. You can find her original post {HERE}. I fell in love with it . . . and anything that involves Peeps . . . LOVE.
Here's what you need:
1 sleeve graham crackers {crushed in a large baggie using a heavy rolling pin}
1/3 cup brown sugar {I like more brown sugar so I use 1/2 cup}
8 marshmallow Peeps
1 cup plain Easter M&M's
1 quart mason jar {I used a paper circle for the lid and some ribbon to decorate}
{to make you'll need to following}
1 stick butter {melted}
1 tsp vanilla extract
I went to Walmart looking for jars and found this box of 12 Mainstays brand for under $8. Can't beat that!!
I've made three of these now. The first time I had a hard time squeezing in all of the M&M's at the end, so the second time I mixed the M&M's with the graham cracker/brown sugar mixture . . . then it was hard to squeeze the Peeps in at the end. So the third time I decided to just layer everything. It turned out the cutest but still was hard to squeeze the Peeps in.

haha . . . slightly crazy, but I got them all in. NEXT time I'm going to pour in half of the graham cracker/brown sugar mixture, then M&M's, then Peeps, then I'm going to pour in the last half of the crumb mixture. I'm thinking this will work better . . . maybe?? haha
To make:
Dump all of the jar contents into a large bowl. Take out the Peeps and either cut them into small or large chunks or save and layer them whole on top of mixture before baking. Melt 1 stick of butter and add to bowl along with 1 tsp vanilla extract. Mix well until everything is coated evenly. Dump into a greased 8x8 baking dish {or whatever you have . . . I don't have one small enough so I used a pie pan} and, with greased fingers, firmly pat the mixture down.

Bake at 350 degrees for 15-20 minutes. Let it cool COMPLETELY before cutting into them so they don't crumble.

A perfect teacher gift or just to swing by a friends house to let them know you're thinking of them.

Happy Easter!!!

Friday, November 12, 2010

Advent {Calendar} Day 2

Day two and we've completed three pockets and started three more. So on top of the two I made yesterday {both white with red polka dots} we have 5 completed . . . 20 more to go.
I made the green with lime green polka dots the same as yesterday. I traced the dots using a poker chip {out of everything I could find that was the best size, but you obviously can use anything or even free hand them}.

My girls made the other two. My 9 year old made the ice skate {it's hard to see but there are two snow flakes above the skate}, and my 6 year old made the present. I cut out a piece of paper for each of them the exact size of the pocket and let them design their own. Once they had them drawn out, they cut out their pictures so they could trace them onto the felt and cut them out. I think they did such a great job! And it will be fun for them to see their own creations on our calendar. They've both started another one. My 9 year old is doing stripes and my 6 year old is doing a snowman . . . both of which are turning out super cute. I have another green polka dot one going too, but ran out of lime green, so I'm throwing in a red polka dot for fun. Anything goes . . . gotta love doing your own thing instead of going off of a pattern!