My first feature!! I was so excited to get an email from Emily at The Rubber Punkin this week letting me know that she picked my blog to feature. Go on over and check out her cute blog and leave her some love. Thank you Emily!
Tuesday, March 23, 2010
Friday, March 19, 2010
Toddler Skirt {refashion}
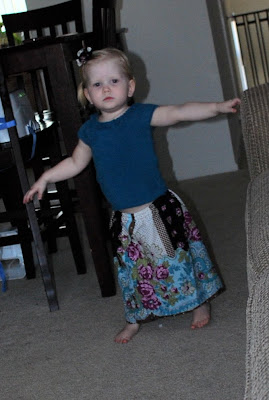
Aaaand I did another refashion today. I'm having a fun time turning our trashed clothes into something cute. Today I took my 8 year old daughter's OLD trashed dress and made a skirt for my 2 year old. Not sure if I like it on her . . . but if I don't like it on her I will bring out the waist and give it to my 5 year old.

Here's the dress. A total mess. I cut it off at the waist, cut the zipper and lining out, and saved the top strip to make a flower hair clip.

Cut the waist band straight across . . . and sew up the side.

Fold over the top and sew about 1/4" to get rid of the raw edge . . .

then fold down far enough to fit your elastic through and sew, leaving about 2 inches open. Measure elastic to fit around your child's waist. Attach a safety pin to one end of the elastic and feed it through the hole.

When it reaches all the way through, sew the ends together, pull tight to fit all the way inside the waist band and sew up the hole. Easy capeasy.

Using the extra strip of fabric from the top part of the dress I made a little flower clip. Tutorial to come . . .


Thursday, March 18, 2010
To My {Followers}
There has been a surge of followers to my blog lately, and it's so fun to click on all of you and find your blogs. I have found a few really fun blogs through you with so many inspiring ideas, so THANK YOU!!
I hit 40 followers today {what!?}, and it gave me the idea to do my first give away. When my blog hits 50 followers I am going to do a giveaway . . . not going to say what yet . . . but all of my followers will be eligible to win.
More details to come . . .
Wednesday, March 17, 2010
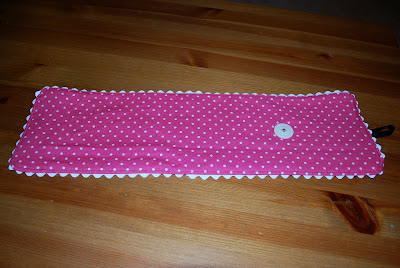
Crayon Roll {tutorial}
I made my older girls crayon rolls for Christmas and they use them all. the. time. So we decided that for their friends birthday's this year I would make them one too. Birthday party tomorrow . . . sewing tonight. {I'm THE biggest procrastinator on the planet . . . but at least I usually get things done}
{Disclaimer} Before I get started I should point out that my dimensions are for the Crayola Mini Twistables crayons. I definitely prefer these over regular crayons because the inside of the crayon roll stays MUCH cleaner. If you want to use regular crayons you'll need to take the dimensions down a bit. Sorry, I don't have those, but I know there are other tutorials online and all the one's I saw use regular crayons.

Start by cutting out your pieces.
You'll need one piece of thicker fabric {I usually use home decor fabric . . . that way you don't have to iron on interfacing to make it thicker} for the inside, and one piece of regular fabric for the outside. They both need to measure 18 1/2" x 6".
Cut one piece of fabric for the crayon pockets. It needs to measure 18 1/2" x 7.

Fold down the 18 1/2" x 7" piece of "pocket" fabric in half . . . line up with the bottom of the home decor fabric and start sewing straight lines all the way down the pocket fabric. The first measurement will be 1 3/8" from the edge. All other spaces will be 1 1/8" apart. You should get 16 pocket's.

You don't have to use rick rack, but I think it makes it a little cuter. I used medium rick rack for this one. Go around and pin making sure to line it up so it doesn't go over the edge.


Sew on a button {sorry, I forgot to take a picture} about 4 1/2" in, onto the outside fabric. {I accidentally sewed mine about 5" in and it's pretty tight.}
Pin the outside piece onto the inside . . . right sides together. Make sure you leave a space open so you can flip it right side out. I always leave the side closest to the button open.

Flip right side out.

And push all of the edges and corners out so that it lays flatter.

Cut a piece of thin elastic about 4" long. Fold in half and pin half way down the edge. Make sure that it's on the same side as the button . . . the side I leave open.

Sew about 1/8" all the way around to flatten the entire thing . . . and closing the open seam.


Fill with crayons . . .

. . . and roll up!

OLD Nightstand . . . Painted {RED}
My parents have had this nightstand for YEARS . . . I mean like 25 years +. They ran out of room and handed it down because I have been dying to have one {so so tired of not having something to put my book, phone, junk on}. Only . . . slightly ugly.

I've always wanted to paint some piece of furniture red . . . don't ask me why . . . couldn't give you a good answer.
{And FYI . . . Krylon spray paint at Joann = $7.99. Krylon spray paint at Walmart = $2.97 . . . learned the hard way that spray paint at Walmart isn't just slightly cheaper . . . it's WAY cheaper!}
Friday, March 12, 2010
Mom's Shirt = Toddler Dress {refashion}
Okay, so it seems that March has turned into my "refashion" month. It's been a lot of fun for me to spend the baby's nap time coming up with ways to turn old things new. Love the "spending no money" part of it the most.
This time I took one of my old shirts that fit weird and turned it into a dress for my 2 year old. I started it a while ago, but decided to pull it out today and finish it.

This is when it was a shirt . . . always bunched up funny on the top . . . so annoying. Glad to find something else to do with it.

First, I cut off the top/strap part . . . {for some reason the other picture didn't download. I cut the top straight, turned it under about 1/4" and sewed a thin seam across the top}

To make the straps I cut 2" strips, folded them in half {iron}, then opened it and folded each end into the center {iron} . . .

. . . then sewed close to each edge to make stay flat.

I made the straps a little long, so I cut the ends off and made bows with the extra . . . thought it added a little cuteness to it.

To cinch the fabric, I used an elastic thread for the bobbin thread and regular thread for the top . . . then just sewed about 1/4" strips. So so so easy.

And it's done. I didn't move pockets or anything . . . seriously easy project.


This girl loves to wear dresses!


Thursday, March 11, 2010
{Another} Ruffle Shirt {refashion}
I've had a sick baby all week, so we've been cooped up at home . . . and instead of going bonkers I decided to make some time for ME, something I never do . . . but I should.
This time I took one of my old shirts that had a hole in it . . . another almost throw away. I just used it as a total experiment since I have no idea what I'm doing when there is no pattern involved.

Here it is . . . the guinea pig . . .

Cut off the sleeves and down the seams . . .

. . . then traced one of my 8 year olds t-shirts for a "pattern" on how big/small to cut it.

Took off all of the buttons and sewed down where the buttons were holding it together . . . then cut the sleeves down a little to make them her size . . . and successfully sewed them back on! {I think I'll make myself some brownies to reward that one}

. . . then cut three strips out of the material I cut off when making it her size . . . one to cover the hole {for some reason it didn't show up in the picture}, one to cover where the buttons were and one to even everything out.

Then as I sewed down the strips I tucked, sewed, tucked, sewed . . . {great instructions, right! haha}

And this is it, before any tweaks . . . which are definitely needed! But I'm proud of myself for putting it all back together! Next time it might actually fit right! :/
Wednesday, March 10, 2010
Ruffle Shirt {refashion}

My 5 year old had this really old, really ratty/ugly shirt that I was ready to throw away, but yesterday I came across this post on Make it and Love it {here} and I thought I'd try to do it using this old shirt . . . because if I ruined it, then it wouldn't be sad for me. I feel like I could have done a better job, but for my first time using this technique and my first time sewing with knit {aside from the memory blanket I made . . . but that knit had iron-on interfacing on the back of each piece}.
ANYWAY . . . heres the ugly shirt with the stain that wouldn't budge on the right shoulder.

I cut a few 1" strips to take the length off and to get some material to use for the ruffling.

Then I cut another 1/2" strip to give the bottom hem a little "something"

I didn't take any pictures of how I did the flowers . . . just take the 1" strip and twist it while wrapping it in a circle. Then just pin them down and sew around onto the shirt. A great way to cover a stain. ;)


The bottom of the shirt . . . not much, but the thin strip added a little texture instead of just folding under and sewing.

And the back . . . didn't realize I got it wet when brushing her hair, but you get the idea. I also had to take in the sides a little bit to make the sleeves smaller for her.

And having a sick baby for a model doesn't ever work out, but I think you get the hint . . . right?
Subscribe to:
Comments (Atom)


